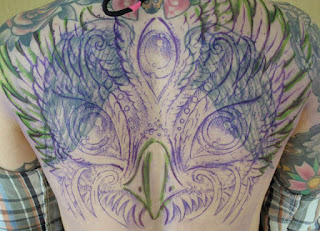
I just did a second pass on a big backpiece coverup tattoo project I've been working on this year, and thought I'd share the photos and talk a little about my strategy. This was a backpiece request, something to cover a pair of fairly old, semi-faded undersized angel wings:
Now, the traditional approach to coverup tattoo projects has always been to go dark, and try to overwhelm the old tattoo. The problem with this approach is that the outlines of the old tattoo almost always show through, even with solid black tribal work, making the piece look like an obvious coverup. Part of the reason for this is a fundamental misunderstanding of coverup tattoos. In reality, you don't cover the old tattoo- you mix it with the new one. All of the pigment particles from both tattoos, old and new, will ultimately reside in the same layers of skin, once the healing and settling have taken place. Knowing this, the best way to hide an old tattoo is to try to absorb it into the new one. Fortunately, my client's request was for a totem pole made of birds, meaning that I could hide the feathery pattern of the old tattoo in the feathery details in the new piece. With the right amount of detail, the new tattoo should be able to capitalize on what's already there. In this stencil, you can see how this works:
For larger work, I tattoo most efficiently on many types of projects by starting magnum first. In this case, I used a 5 magnum, which has very low skin resistance, allowing for quick work. It's also a small enough needle group to rough in bold lines while being wide enough and spread enough to permit some basic rough shading and color gradients. In this first step, I aimed to work the detail in such a way to help conceal the old tattoo as much as possible, without creating a dark region in the tattoo:
At this point, the old tattoo is already starting to get buried in the new one. The next step, though, allows for selective saturation in just the right places: the tightening stage. After finishing with that initial magnum pass, working with a 5 or 7 round permits the refinement of edges and cleanup and darkening of key details, in such a way as to make the tattoo much stronger:
This consists of darkening the bold lines made with the 5 magnum and saturating the feathery details in such a way as to incorporate and camouflage the old outlines. The old tattoo is really starting to fade into history here. After that, I had to move pretty quickly with the color, since the client was in pain and needed me to finish as quickly as I could. Since I knew we'd have another chance at a later date to really saturate the color, I focused on the coverup areas and laid down as much color as possible in that short time using a 13 magnum. At the very end, I switched to a small magnum and blasted white over the remaining obvious coverup areas:
In this first session, I deliberately aimed a little light, knowing I would have a second (and third, if necessary) chance to add more detail, saturate the color more and do whatever necessary to really hide the old piece. I knew this first pass would heal light, which it did:
However, it made for a really solid foundation for the second pass. This time through, I first got into it with a 5 round to work all the detail, using a combination of black and color to try hiding the remaining unwanted old detail. I then made a thorough second pass with a 13 mag through all the color, then resaturated it in key places with a 7 mag. With the magnum pass finished, I spun through one last time with the 7 round and some of the lighter colors, then some white highlights:
This tattoo is not necessarily finished- I anticipate needing a final pass through the coverup zone, darkening the details another step and going deeper and more saturated with the color in select places. A big part of the job, though, is in also adding similar amounts of detail and rich color throughout the whole backpiece, as such:
Part of the art of coverup tattoos is in accepting that a small amount of the old tattoo may be visible, and distracting the eye from that with strong detail and movement. Using large areas of black shading over the old wings would not have made the piece look any less like a coverup- on the contrary, it would look even more like one.
I plan on putting together the big book on coverup tattoos in 2011. In the meantime, though, you can learn all kinds of great stuff from the items in our existing catalog, including detailed techniques on all styles of tattooing. Remember that many of the items in our catalog are only shipped to professional tattoo studios- you don't want to be the tattooist doing the work that we have to cover up!
Happy tattooing, and I will be in touch soon!
Guy Aitchison
www.tattooeducation.com
www.hyperspacestudios.com
www.protonpress.com


WOW, this is amazing
ReplyDelete